Working with AWS
Introduction
Info
If you wish to use LigandScout Remote with a cluster in the AWS cloud, please contact support@inteligand.com after reading this documentation page.
We will enable your AWS account to access Inte:Ligand's AWS resources. If you have special requirements, we can help streamline the process by providing a customized configuration.
Additionally to installing the server application on a physical cluster machine, it is possible to automatically deploy a fully-configured cluster in the AWS cloud. This option enables the use of LigandScout’s remote execution capabilities without access to a physical on-site cluster. AWS allows to deploy arbitrarily large clusters that are billed per hour of up-time.
Reference
AWS Landing Page: https://aws.amazon.com/
Furthermore, HPC clusters in the cloud come with an important advantage over traditional clusters. They are elastic, which means that they can automatically scale up and down, depending on the current workload. The iserver fully exploits this benefit by splitting large jobs into multiple smaller sub-jobs.
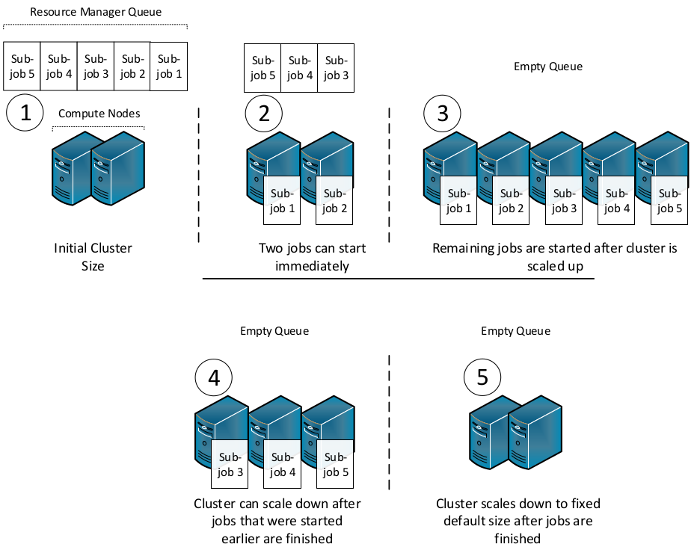
Consider the example of a small cluster and a large screening job that is split into several sub-jobs, each planned to run on all CPU cores of a single node. The below figure illustrates this scenario using five sub-jobs and an initial cluster size of two compute nodes. Two of the sub-jobs can immediately start to execute while additional nodes are added to the cluster. These can then be used to execute the three jobs that are waiting in the resource manager’s queue. Once the number of sub-jobs becomes less than the number of nodes, the cluster can start to scale down and reduce running costs.
Overview
Assembling and setting up physical HPC clusters requires weeks of effort from IT specialists and ongoing maintenance. In contrast, setting up a cloud cluster can be done with just basic command-line knowledge. This page aims to guide you through the 6 required steps:
- Creating an AWS Account
- Creating an AWS access key for programmatic access
- Creating a Key Pair for accessing cluster nodes
- Installing AWS ParallelCluster
- Configuring AWS parallelCluster
- Creating your cloud cluster
Tip
We recommend skimming through the full page before going into detail and performing the 6 required steps. This approach helps to understand the connections between the steps.
The following illustration depicts how these steps depend on each other. You can click on the nodes to jump to the respective documentation section:
AWS Account Management
Tip
The screenshots in this section can be enlarged by clicking on them. Use the middle mouse button to quickly open a screenshot in a new tab.
In order to deploy a cluster for virtual screening and conformer generation in the AWS cloud, you will need to set up an AWS account.
Creating Your AWS Account
Simply go to https://aws.amazon.com and click on Create an AWS Account.
AWS also provides detailed instructions regarding account creation.
Creating an AWS Access Key
We will use AWS ParallelCluster to perform automatic deployments of virtual create cloud clusters. In order for this tool to be able to create computational resources for our account, we will need to provide a programmatic access key. This AWS Access Key can be created and downloaded right from the web interface.
Go to the My Security Credentials section of your AWS account located in the top right of the AWS management page:

In the Security Credentials Section, you can then simply click Create New Access Key:
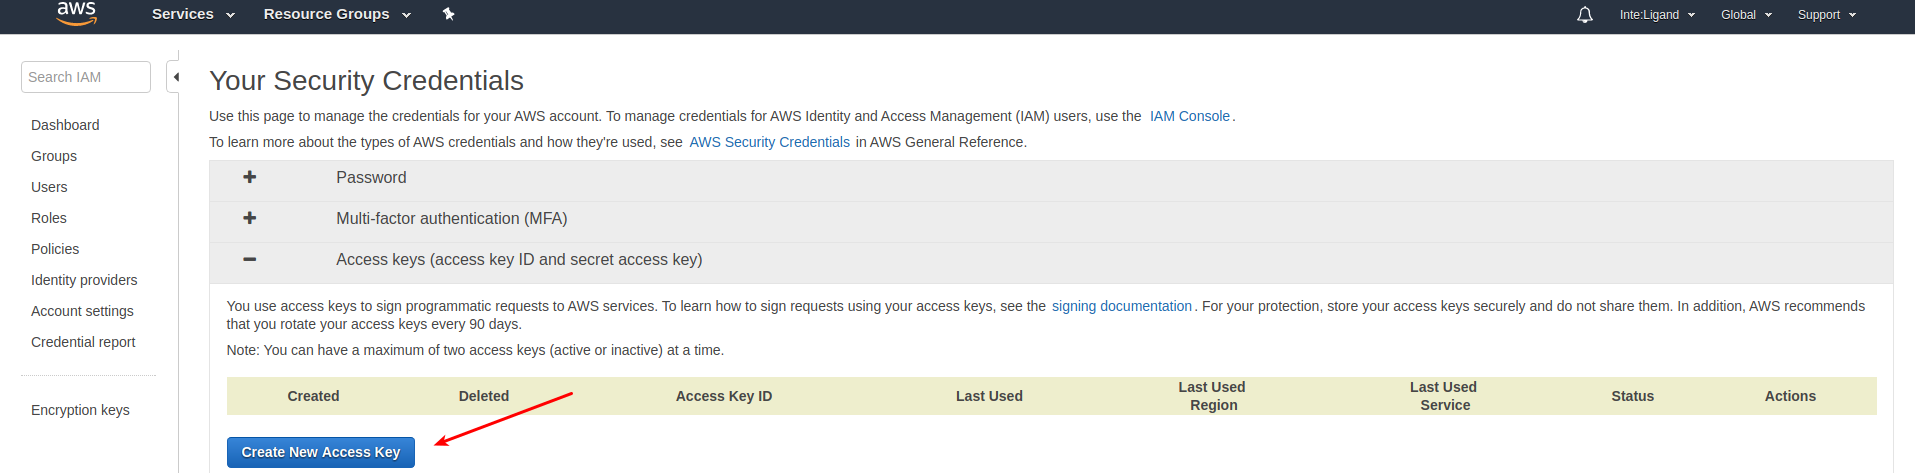
Warning
The secret access key can only be downloaded right after it is created. Make sure to store it in a safe place, we will need it later. If you didn't save it, you can revoke the key and create a new one.
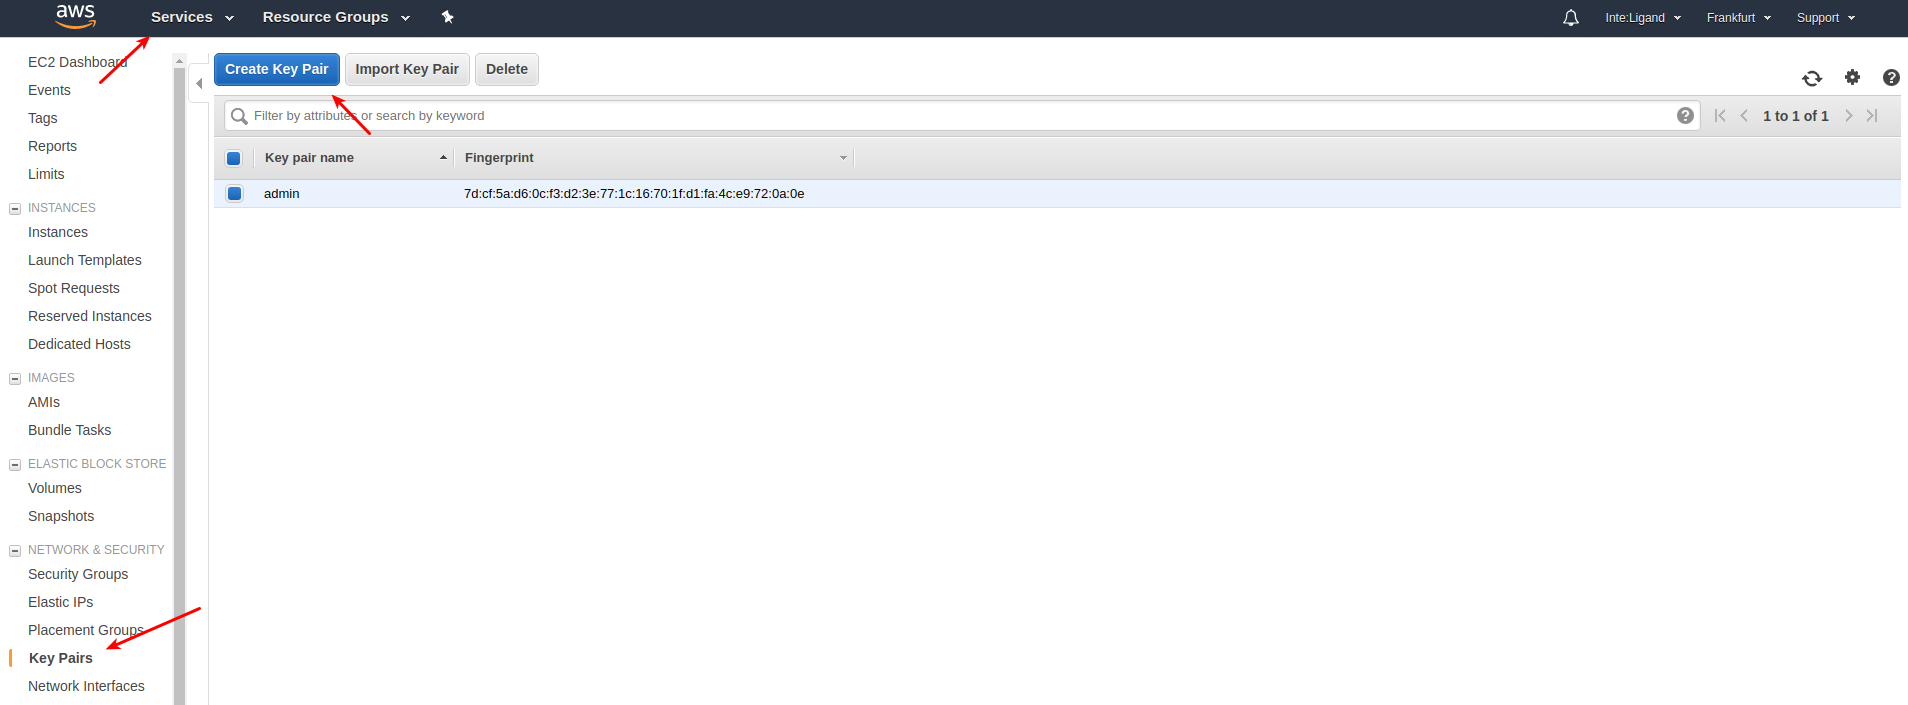
Creating a Key-Pair
Next, we need to create a key pair (public and private key) that we will use to gain access to the created cluster nodes. Most importantly, it is required to connect from within LigandScout or KNIME to the LigandScout Remote Server application running on the cluster's head node. In addition, this key pair can be used to manually access the nodes over SSH.
Navigate to the respective page via
Services -> EC2 -> Key Pairs -> Create Key Pair.
Make sure to choose the pem file format. The ppk format is not supported from within LigandScout or KNIME.
Deployment with AWS ParallelCluster
To facilitate automatic deployment and configuration, we use Amazon’s ParallelCluster tool. It can be installed on your local desktop computer or notebook and is then used to send complex instructions to AWS. This means you will be able to deploy clusters in the AWS cloud directly from your personal (local) computer.
Info
AWS ParallelCluster was previously named CfnCluster. Both versions work almost exactly the same. However, the former CfnCluster tool uses the cfncluster command instead of the newer pcluster.
The following video briefly illustrates how easy it is to create a cloud cluster and subsequently use it for virtual screening, once AWS ParallelCluster is configured.
Reference
AWS ParallelCluster Project on GitHub
https://github.com/aws/aws-parallelcluster
The entry point for the official AWS ParallelCluster Documentation can be found at
https://docs.aws.amazon.com/parallelcluster/latest/ug/what-is-aws-parallelcluster.html.
Installing AWS ParallelCluster
Please use the official documentation to install the tool:
https://docs.aws.amazon.com/parallelcluster/latest/ug/install-v3-parallelcluster.html
It is not important on which machine you install AWS ParallelCluster. You can also install it on several machines and use them in parallel.
Creating an AWS ParallelCluster
After installing AWS ParallelCluster using the instructions provided at above reference, it is required to configure it. Please use the official step-by-step guide to configure the cluster: https://docs.aws.amazon.com/parallelcluster/latest/ug/install-v3-configuring.html
The aws configure command requires you to set the following parameters:
- Default region name
- AWS Region where the created cluster should be located. You can see region name of the currently selected region when you click in the top right of the AWS Management Console (web interface). Examples are
eu-central-1,us-east-2, andsa-east-1. - AWS Access Key ID
- ID of the programmatic access key that enables AWS ParallelCluster to create resources for your account. See the above description on how to create this key.
- AWS Secret Access Key
- The actual secret key that enables AWS ParallelCluster to create resources for your account. You need to download this key directly after creating it as described above.
pcluster configure will create a yaml configuration file which offers a large number of possible configuration parameters. These range from
straightforward settings, such as the operating system to be used for the created cluster nodes, to network-related settings.
In our configuration, we use Ubuntu 22.04 as the base operating system (base_os) and Slurm as the resource manager (scheduler).
Furthermore, an Elastic Block Storage (EBS) snapshot is used that contains a pre-configured LigandScout Server installation. This snapshot is specified in the ParallelCluster configuration (ebs_snapshot_id) to serve as the template for the shared storage volume of all cluster nodes.
Another important configuration option is the type of compute instance to use (compute_instance_type). Along with the number
of used nodes (initial_queue_size & max_queue_size), this is the main cost factor. Amazon offers a large variety of different
specifications, starting with one virtual CPU per instance and ranging up to more than 100 cores
per virtual machine. The iserver application is intended to work with compute instances of all sizes.
Reference
Amazon EC2 Instance Pricing List:
https://aws.amazon.com/ec2/pricing/on-demand/
Another parameter is the AWS EC2 Key pair that we will later need to access our clusters over SSH. In contrast to the AWS Access key, this key is not for accessing your AWS account, but for accessing the created EC2 instances. See above on how to create an EC2 key pair form the AWS web interface.
In the configuration step, we also need to set-up a VPC for the cluster. ParallelCluster can automatically create a VPC and corresponding subnets for your clusters. However, we recommend to use an existing VPC and subnet if there is already one present for your account.
Additonally, we need to specify the post-installation script file (post_install_args) provided by Inte:Ligand. This script is run on the master node of your cloud clusters at the end of the setup process. The first argument is mandatory and must be a valid LigandScout Expert serial number.
Additional arguments are optional and for setting ready-to-use screening databases to download from Inte:Ligand's S3 resources. The possible database names are listed in below section.
For advanced information on the inner workings of the post_install script, see the respective section below.
Info
In order to share our template snapshot with you, we need to know your AWS Account ID (Visible under <Account Name> -> My Account -> Account Settings). Furthermore, EBS snapshots have to be created in the same region as the clusters depending on them. Therefore, we also need to know your preferred AWS region (e.g. eu-central-1).
If you would like to download ready-to-use molecule screening databases (.ldb) provided by Inte:Ligand, we also need your Canonical User ID. This ID is different from the AWS account ID and can be found at <Account Name> -> My Security Credentials -> Account identifiers.
Info
Previous versions of this document stated that five is the maximum amount of c5.2xlarge instances available to new AWS customers. This is no longer true. AWS now looks at the total amount of used CPU cores. The default limit is dependent on a number of factors, but should be at least a few hundred cores. The AWS console shows all current limits under Limits. The most relevant limit is Running On-Demand All Standard (A, C, D, H, I, M, R, T, Z) instances. It is possible to request limit increases.
Ready-to-use Screening Databases
These databases are available for download from Inte:Ligand's S3 storage. This can be done automatically when creating a new cluster. Set the databases to download via the post_install_args setting in the yaml config file, as explained above. You can dowload multiple databases, for example:
post_install_args = "<LigandScout Serial> chembl_28 cdk2-actives"
Please note that Inte:Ligand must grant your account access to these databases before you can use them via post_install_args. Some databases are not included in a regular LigandScout Expert license. Contact us to discuss purchasing options.
Available Databases
- cdk2-actives
- 37 ligands for the cyclin-dependent kinase 2 binding site. Suitable for testing purposes. (37 molecules, 3.2 MB)
- chembl_28
- ChEMBL is a manually curated database of bioactive molecules with drug-like properties. (~2.1 million molecules, 19 GB)
- scubidoo
- A database of computationally created chemical compounds optimized toward high likelihood of synthetic tractability (1 million molecules, 7.5 GB)
- molport
- The MolPort database contains compounds purchasable from stock and made-to-order compounds. (7.35 million molecules , 58GB)
- molport_newstock_2020
- Recent additions to the Molport database. (300 000 molecules , 2.6 GB)
Important Note:
Download multiple databases, especially from other regions than eu-central-1 might result in timeout errors during cluster startup, as AWS ParallelCluster restricts how long the post_install script is allowed to run.
We recommend downloading only databases with less than 30GB via post_install_args. Downloading large databases should be done after the cluster has been created. To download databases after cluster creation, log in via SSH to the master node via its public IPv4 adress and execute the respective commands. For example, to download and extract the molport database, do:
aws s3 cp s3://il-databases/molport.tar.gz /shared/data/compound-databases/il-databases/molport.tar.gz --request-payer
tar -zxvf "/shared/data/compound-databases/il-databases/molport.tar.gz" -C /shared/data/compound-databases/il-databases/
rm /shared/data/compound-databases/il-databases/molport.tar.gz
The first command downloads the database, the second command then extracts the database chunks to the designated location. Finally, the third command deletes the originally downloaded archive to save storage space. To download other databases, replace molport with the respective database identifier.
Warning
Downloading screening databases from Inte:Ligand's S3 storage will induce additional charges (0.02$ per GB), and increases cluster startup time. If you have created your own snapshot that already has the required screening databases, you should not download them again. Simply remove the databases from the post_install_args setting before creating a new cluster.
Working with AWS Clusters
Command-Line Interface
AWS ParallelCluster provides a command-line interface for interacting with AWS clusters.
Reference
The different commands are documented in detail in the official AWS ParallelCluster documentation:
https://aws-parallelcluster.readthedocs.io/en/latest/commands.html
The most essential command is create. It is needed to initiate the creation of a new cluster:
pcluster create my-cluster-name --cluster-configuration my-cluster-config.yaml
Congratulations, you just deployed a HPC cluster to the cloud! After the create command has finished, your cluster is ready to use for virtual screening and conformer generation through LigandScout and KNIME.
Info
If pcluster create fails to start a new cluster, the --norollback option can be used for debugging purposes. Then, the cluster will be created even if parts of the post-install script fail. You can then log into the master node of the cluster using below ssh command. Inspect the /var/log/cfn-init.log and /var/log/cfn-init-cmd.log files for possible failure causes.
For inspecting the resulting cluster or performing arbitrary manual changes, it is possible to log into the master node of a cluster using SSH. The <master-node-ip> is visible in your AWS console and also printed after succesful cluster creation with pcluster create.
ssh -i <path-to-key-file/key-name.pem> ubuntu@<master-node-ip>
This ssh command also shows the credentials needed to access the cluster from within the LigandScout user interface. The username created by AWS ParallelCluster using our configuration is ubuntu. Instead of a password, you need the private key file created earlier and specified in your ~/.parallelcluster/config file via key_name.
In order to save running costs, it is recommended to stop the cluster when it is not needed. It can be done using the stop command:
pcluster stop my-cluster-name
Warning
The stop command does not terminate the cluster completely. The master node and the shared storage volume will continue to run. However, the master node is usually a small and cheap instance. The cost for running volumes is around 0.1€ per month per GB. Therefore, a stopped cluster has only very limited cost implications.
If you want to continue working with a currently stopped cluster, use the start command:
pcluster start my-cluster-name
Once you no longer need a cluster, for example because a snapshot with a newer iserver version is now available, you should delete it:
pcluster delete my-cluster-name
Deletion of a cluster will terminate all resources and therefore no further costs will emerge.
Warning
Cluster deletion will also delete the shared storage volume and all data on it. Make sure to save all screening results locally before deleting a cluster. You can also create a new snapshot from the volume and use it for future clusters.
Updating to Newer iserver Versions
Instead of creating an entirely new cluster from an updated official snapshot, you can easily upgrade your existing AWS cluster to use the newest iserver version.
First, log into the master node of your cluster using SSH. SSH access is described in the previous section. Then, switch to the iserver installation directory:
cd /shared/apps/ligandscout_server/
From there, you can proceed with the regular update procedure, as described for physical cluster installations.
Creating Snapshots
If you want save the state of your cluster, we recommend to create your own EBS snapshot, which can subsequently be used as basis for creating new cloud clusters.
Snapshots save the state of a running volume. Therefore, to create a new snapshot, head to the Volumes section of the AWS Console under Elastic Block Storage -> Volumes. Then, select the shared volume of your running cluster. If you are using the provided default configuration, this is the volume with 30GB storage capacity. The root volumes of the compute instances and also the root volume of the master node only have 15GB. Then, press Create Snapshot and choose a reasonable name and description for easier classification of your new snapshot.
Under Elastic Block Storage -> Snapshots, you will be able to manage your new snapshot and see its Snapshot ID. In order to use the new snapshot for future clusters, copy the Snapshot ID and set it in your ~/.parallelcluster/config file as ebs_snapshot_id. New clusters created with pcluster create my-cluster-name will have access to all data thas was present on the shared volume used for snapshot creation, including virtual screening results and newly created screening databases.
Warning
Snapshots consume EBS storage and will result in additional costs. However, a single 30GB snapshot will only cost 0.054 * 30=1.62\$ per month.
Uploading Additional Screening Databases
LigandScout Remote allows to create new screening databases from local molecule libraries via conformer generation. If you already have databases you want to use with your AWS cluster, you need to upload them. This can be done using any file transferring technique. Since the remote cloud cluster is already reachable via SSH, we recommend to use scp for this task.
On Linux or Mac systems, you can simply use the following command:
scp -i <path-to-key-file/key-name.pem> -r /path/to/database.ldb ubuntu@<master-node-ip>:/shared/data/compound-databases
On Windows, a separate SCP client, such as WinSCP is needed.
After the upload of the database is complete, refresh the server's database list using the Load Remote Database dialog within the LigandScout GUI.
Starting from version 1.1.7, it is also possible to upload existing databases directly from the LigandScout user interface.
Warning
In any case, it is required that the cloud cluster has enough storage capabilities newly uploaded databases. Please be aware that the configuration provided by Inte:Ligand likely does not cover these additional storage requirements in order to limit AWS charges. However,it is easily possible to increase the cloud storage retrospectively. See the next section.
Increasing the Shared Volume Size
If you plan to upload large additional screening databases, or perform extensive conformer generation jobs, you will likely need to increase the shared storage volume of your cloud cluster at some point. This is a two-step process:
- First, log into the AWS web interface (Console) and go to
Services -> EC2 -> Elastic Block Store -> Volumes. Here, you will see a list of all currently used volumes. There will be one root volume per compute node, one root volume for the master node, and additionally the shared storage volume that is accessible to all cluster nodes. We need to modify the shared volume, which will be the one with the largest storage capacity. Simply mark it in the list, then clickActions -> Modify Volume. The following dialog will appear:
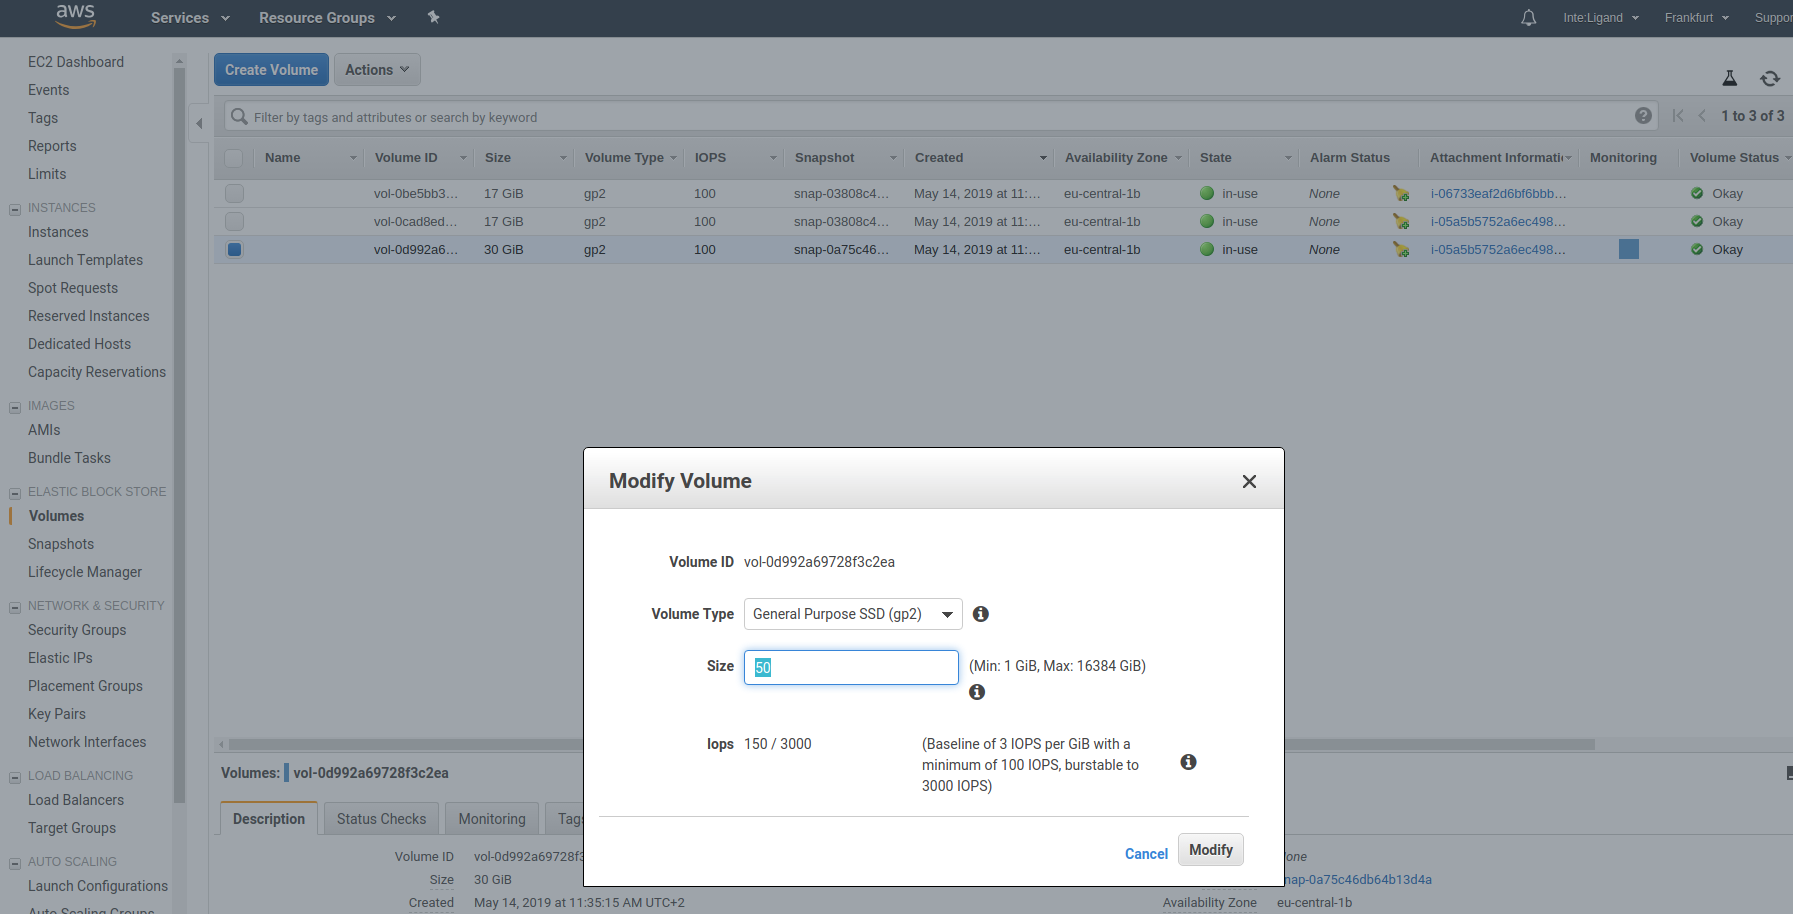
Here, you can set the new volume size. Depending on the size of the increase, the volume will be in optimizing state for up to a few hours. During this period, the volume will exhibit less than optimal performance. You can still use your cluster as normal.
2. After increasing the volume size, it is required to extend the filesystem in order for the change to be recognized. This can be done by executing a single command on your cloud cluster. Access your master node via the command already introduced above:
ssh -i <path-to-key-file/key-name.pem> ubuntu@<master-node-ip>
df -h to verify the current size of the file system for each volume. Identify the entry that is showing the original volume size and is mounted on /shared, usually /dev/xvdb. Finally, excecute the following command for extending the file system:
sudo resize2fs /dev/xvdb
df -h once more.
Info
If you want to create additional clusters with your new volume size, create a snapshot as described in Creating Snapshots.
References
- Official AWS Documentation for modifying EBS volumes:
https://docs.aws.amazon.com/AWSEC2/latest/UserGuide/ebs-modify-volume.html - Instructions for increasing volume size via the AWS web interface (Console):
https://docs.aws.amazon.com/AWSEC2/latest/UserGuide/requesting-ebs-volume-modifications.html#modify-ebs-volume - Instructions for extending the Linux file system after volume modification:
https://aws.amazon.com/ec2/spot/pricing/
Cost Management
The cost of cloud clusters is surprisingly low. Nevertheless, it is essential to monitor all charges carefully and to consume only resources that are actually needed.
A good starting point for staying informed about your costs is your AWS Billing Dashboard.
References
- Official AWS Cost Management Documentation:
https://aws.amazon.com/aws-cost-management/ - EC2 On-Demand Instance Pricing:
https://aws.amazon.com/ec2/pricing/on-demand/ - EC2 Spot Instance Pricing:
https://aws.amazon.com/ec2/spot/pricing/ - EBS Volume and Snapshot Pricing:
https://aws.amazon.com/ebs/pricing/
Example Cost Calculation
The current default configuration for LigandScout Remote clusters specifies a maximum number of five c5.2xlarge instances. A c5.2xlarge instance costs 0.388 \frac{\$}{h} and comprises 8 compute optimized CPUs, which means that the full cluster provides 40 cores.
Warning
The prices given in this section depend on the used AWS region, are subject to frequent change, and might be different at the time of reading. However, prices usually go down when newer instance types are released. Nevertheless, be sure to check current prices using the above references.
To calculate the full cost of running this cluster, several factors have to be considered. We start by calculating the running costs of all 5 compute instances. Additionally, there are charges for the master node instance. Per default, the instance type for the master node (specified with master_instance_type) is t2.micro. The price for this instance is 0.0134 \frac{\$}{h}.
The charges for the storage volumes associated to the cluster are calculated as follows:
Compute instances root volumes: $$ 5 * 15 = 75 GB $$ Master Node Root Volume and shared storage volume: $$ 30 + 15 = 45 GB $$ Total storage volumes capacity: $$ 45 GB + 75 GB = 120 GB $$ Total storage volumes cost for cluster running at full capacity (5 compute nodes), assuming 720 hours per month: $$ 120 * \frac{0.119}{720} = 0.02 \frac{$}{h} $$ The total cost for the cluster running at full capacity is therefore: $$ 1.9534 + 0.02 = 1.9734 \frac{$}{h} $$ If the cluster is stopped, only the prices for the master node instance, the master node root volume and the shared volume apply: $$ 0.0134 + 45 * \frac{0.119}{720} = 0.02 \frac{$}{h} $$
If the complete cluster runs for a full month, every hour of every day, the total cost will be around
1.9734*720=1420.85\$. This may sound expensive, but keep in mind that the cluster will automatically scale down to only one running compute instance, when the queue is empty. A cluster that is stopped via pcluster stop my-cluster-name will cost around 0.02*720=14.4\$ per month.
If the cluster runs for 2 hours every day of a 30-day month and is stopped the remaining time, it will cost around 30*2*1.9734 + 30*22*0.02=131.6\$.
Cost Reduction using Spot Instances
AWS does not only offer on-demand instances, which are provided for a fixed cost at all times. Additionally, it is possible to use spot instances. The so-called spot price depends on current supply and demand and is up to 90% cheaper than the price for on-demand instances.
If you want to use spot instances, simply include the following line in your ~/.parallelcluster/config file, before creating your cluster:
cluster_type = spot
Using the above setting, AWS will charge the current spot market price, capped at the on-demand price. The price is therefore guaranteed to be lower or equal compared to using on-demand instances. If you want to further reduce running costs, you can also set the maximum price you are willing to pay per compute instance per hour:
spot_price = 0.15
If you specify a spot_price, AWS will terminate your instance once the current spot market price exceeds your limit. Even without specifying an explicit spot_price, it is possible that the instance is terminated when the available supply of spot instances approaches 0.
However, this does not pose a problem to LigandScout Remote. Both screening and conformer generation jobs are fault tolerant. In practice, this means that failed sub-jobs can easily be restarted without having to repeat the complete job. This feature is accessible through LigandScout and KNIME by right-clicking on a failed sub-job in the respective job monitoring dialogs.
Warning
Restarting parts of a failed job is only possible with iserver 1.1.7 or newer. If you are using an older version, you need to restart the complete job in case a cluster node is terminated unexpectedly. Therefore, we strongly recommend to update to the most recent version, in case you want to use AWS spot instances.
Reference
AWS Spot Instances Overview
https://aws.amazon.com/ec2/spot/
Official AWS Spot Instances Documentation
https://docs.aws.amazon.com/AWSEC2/latest/UserGuide/using-spot-instances.html
AWS Parallelcluster Spot Instances Settings
https://aws-parallelcluster.readthedocs.io/en/latest/configuration.html?#spot-price
Post-Install Script
An important prerequisite for a ParallelCluster deployment is the post install script. The thereby defined actions are executed on every cluster node after the automatic base setup is finished. This initial base setup includes configuring the network, connecting the shared storage volumes, and initializing the resource manager and job scheduler.
Apart from this, the most important step is to start iserver.
Below, you can see the post_install script that Inteligand provides for you. This script activates the LigandScout installation with your serial number, and downloads ready-to-use screening databases from Inte:Ligand's S3 storage. For more information about downloading screening databases, see above section of this page.
1 2 3 4 5 6 7 8 9 10 11 12 13 14 15 16 17 18 19 20 21 22 23 24 | |
Info
You do not need to execute the post-install script yourself. Instead, you only have to define a location from where the script can be downloaded (post_install) in your ~/.parallelcluster/config file, so that it can be automatically executed on all instances added to your cloud cluster. The download path for the above script is http://www.inteligand.com/download/aws/post-install-1-2-0.sh.